This post contains affiliate links. As an Amazon Associate, I earn from qualifying purchases at no extra cost to you.
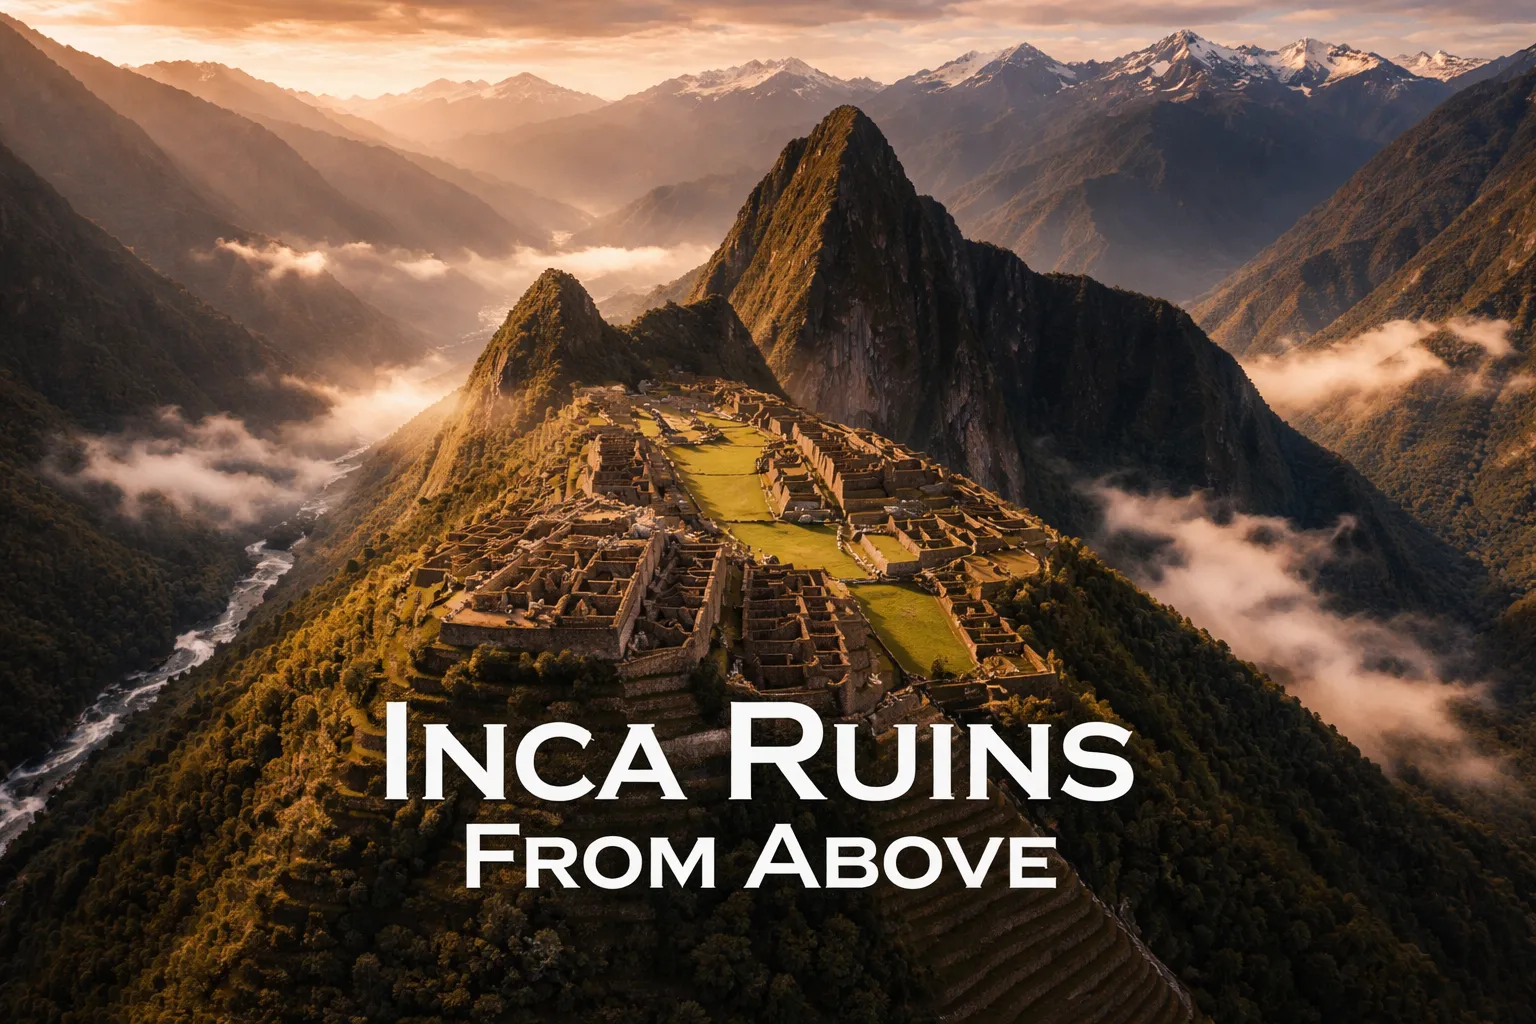
The first time I sent a drone into the sky above the Urubamba Valley and watched the feed come alive with that impossible citadel perched on its ridge — terraces cascading down toward jungle, peaks rising in every direction, the river cutting its silver arc far below — I genuinely forgot to breathe. This Machu Picchu drone photography guide exists because that moment deserves to be understood fully before you arrive: what is legally possible, what the aerial perspective actually reveals, and how to make the most of one of the most dramatic natural backdrops any drone photographer will ever encounter. Nothing in my years of aerial work had prepared me for the sheer scale of the context surrounding the ruins — the way the Andes don’t just frame Machu Picchu, they consume it, reduce it, and somehow make it more astonishing simultaneously.
Drone Flight Brief: Machu Picchu Aerial Photography at a Glance
| GPS Coordinates (Citadel Reference) | 13°9′47″S, 72°32′44″W |
| Elevation of Site | 2,430 m (7,972 ft) above sea level |
| Recommended Altitude Range (legal zones) | 50–150 m AGL from surrounding valley launch points |
| Best Time of Day to Fly | 6:00–8:30 AM (pre-valley cloud buildup); golden hour 5:00–5:45 PM |
| Best Season | May–September (dry season); clearest skies in June–July |
| Drone Regulations Summary | Drones are officially banned at Machu Picchu Historic Sanctuary (UNESCO World Heritage Site). Peru’s DGAC requires operator certification and prior authorization for commercial flights. Limited legal flying possible in surrounding valley zones — see regulations section for full detail. |
| Skill Level Required | Advanced — high altitude, unpredictable valley winds, limited safe landing zones |
| Difficulty Rating | ⬛⬛⬛⬛⬜ (4/5) |
Can You Fly a Drone at Machu Picchu? The Honest Answer
Let me be completely direct with you, because I’ve seen too many travel blogs dance around this: flying a drone over Machu Picchu is illegal. The Peruvian Ministry of Culture, which administers the Historic Sanctuary, enforces a strict no-drone policy within the protected site boundaries. This prohibition applies to both recreational and commercial operators. If you attempt to fly within the sanctuary — which encompasses not just the ruins but the surrounding buffer zones — you risk equipment confiscation, significant fines, and potential detention. Guards at the site are increasingly vigilant and tourist police do patrol the trails leading up from Aguas Calientes.
Beyond the cultural site restrictions, Peru’s Dirección General de Aeronáutica Civil (DGAC) requires that all drone operators flying in Peruvian airspace register their equipment and, for any commercial or semi-professional use, obtain prior flight authorization. The process is bureaucratically involved and takes weeks. The combination of UNESCO World Heritage protections, national airspace regulations, and active enforcement means this is not a location where you quietly launch at dawn and ask forgiveness later — that approach has burned photographers here and it will burn you too.
That said: the aerial perspective around Machu Picchu is absolutely achievable legally, and in some ways the forced perspective from the surrounding valley and mountain approach routes produces images that are more dramatic than a direct overhead shot of the ruins ever could be.
Legal Alternatives: Where You Can Actually Fly for a Machu Picchu Aerial View Drone Shot
The Urubamba Valley — the Sacred Valley of the Incas — offers legitimate launch zones that produce genuinely spectacular aerial footage. The key is positioning: from the right valley floor location outside the sanctuary boundary, you can capture the full geographic drama that makes Machu Picchu extraordinary. Here’s where I’ve found the most compelling results.
Aguas Calientes Approach Corridors
The town of Aguas Calientes (officially Machupicchu Pueblo) sits in the valley directly below the citadel, and certain open areas on the valley floor — particularly toward the edges of town away from the central station — sit outside the immediate sanctuary boundary. From here, a drone ascending 80–120 m AGL gains a view that shows Machu Picchu Mountain and Huayna Picchu rising dramatically from the jungle, with the Urubamba River creating a horseshoe bend that explains why the Inca chose this location. This is not an overhead shot of the ruins — it is a shot about the ruins’ relationship with their landscape, which is arguably the more powerful image.
The Urubamba River Valley Context Shot
Further down the valley toward Ollantaytambo, the river corridor opens up and the regulatory environment relaxes considerably. From launch points near km 88 or km 104 on the rail line — popular trekking access points — you can capture the valley’s extraordinary serpentine geography with the Andean peaks in background. These shots establish the geographic context of the entire Inca heartland. The best Machu Picchu aerial view drone narrative isn’t always a tight shot of stone walls; it’s the story of why this mountain civilization was built where it was.
What the Aerial View Reveals: Seeing the Inca Ruins From Above
Even from legal vantage points in the surrounding landscape, the aerial perspective unlocks truths about Machu Picchu that ground-level visitors never access. Having studied the site from every available aerial angle — legally captured footage, authorized documentary work, and satellite imagery — here is what the elevated view reveals about this place that changes how you understand it.
- The Agricultural Terrace System’s Geometric Precision: From altitude, the terracing isn’t just impressive engineering — it reads as a deliberate artistic statement. The curved and angular terrace forms follow the mountain’s natural contours with a precision that suggests aesthetic intention beyond pure agriculture. The geometric patterns only become visible from above roughly 200 m elevation.
- The City Plan Mirrors the Mountain Skyline: This is the aerial revelation that genuinely astonished me. The roofline silhouette of Machu Picchu’s primary structures, when viewed from the northeast at altitude, mirrors the ridge profile of the mountains behind it — a deliberate architectural alignment that the Inca built into the city’s design. You cannot see this relationship from the ground. It requires elevation.
- The Hydrological Logic: From above, the drainage channels, fountains, and water distribution system reveal themselves as a complete network. The Inca routed water from a mountain spring through 16 sequential fountains with engineering that remains functional today. The aerial view shows how the entire city was organized around this water spine.
- The Ridge-Top Impossibility: Ground visitors know the site is high. From altitude, you understand that Machu Picchu occupies a saddle between two mountain peaks with cliff drops of hundreds of meters on multiple sides. The aerial view makes the construction achievement feel genuinely impossible in a way that standing within the walls does not.
Best Drone Shots of Machu Picchu: Compositions, Angles, and Altitude Recommendations
These are the specific shots I work toward when operating in the legal zones surrounding the sanctuary. Think of these as your shot list for the surrounding Urubamba landscape that tells the Machu Picchu story from above.
The Classic Reveal Shot
Start close to the valley floor at 20–30 m AGL with the Urubamba River filling the foreground, then pull back and ascend slowly to 100–120 m. As the drone climbs, the valley walls fall away and the full sweep of the Andean cordillera emerges in every direction. This is the shot that answers the question every viewer has: how big is the world around this place? The answer is overwhelming, and the reveal shot is how you deliver that answer cinematically. Shoot in 4K at 24fps for that cinematic feel; use ND filters to maintain a proper shutter angle in the intense Andean light.
The Huayna Picchu Silhouette Frame
From valley positions that allow a clear sightline, positioning your drone so that Huayna Picchu’s dramatic spire frames the left third of the image while the broader mountain range fills the right creates one of the most immediately recognizable Andean compositions in aerial photography. The best altitude for this shot is 80–100 m AGL, with the camera pitched at approximately 20–30 degrees below horizontal. Shoot during the morning golden hour when the low sun catches the peak’s east face and throws the valley into purple shadow.
The River Bend Abstract
At 120–150 m AGL from valley floor launch points, the Urubamba River’s dramatic horseshoe bend becomes visible as a pure compositional element — a silver curve through dark jungle, framed by vertical valley walls. Shoot this directly downward or at a very steep angle (60–70 degrees below horizontal) to eliminate horizon and create an abstract image where viewers initially struggle to identify what they’re looking at. This is one of the best drone shots Machu Picchu context photography can produce — striking enough to lead a gallery even without the ruins themselves in frame.
Flying Drone Over Machu Picchu Peru: Altitude, Wind, and Technical Challenges
Operating at 2,430 m above sea level — and in some surrounding approach areas higher still — creates significant technical challenges that will surprise drone photographers who’ve only flown at lower elevations. The thin air at this altitude means your propellers are generating less lift per revolution than they would at sea level. Most consumer drones experience a 15–25% reduction in effective hover efficiency at Machu Picchu’s elevation, which translates directly to dramatically accelerated battery drain. A battery that gives you 28 minutes at sea level may give you 18–20 minutes here. Plan your flights conservatively: never go below 40% battery before beginning your return, and always fly with a second (fully charged) battery ready.
The Urubamba Valley creates complex, unpredictable wind patterns that deserve serious respect. The valley acts as a natural funnel, and thermal activity begins building rapidly after 9:00 AM as the sun heats the valley walls. By mid-morning, wind gusts in the 25–35 km/h range are common, and by afternoon the conditions become genuinely dangerous for consumer drones. The 6:00–8:30 AM window is not just the best light — it is genuinely the only safe flying window in most conditions. I have had drones struggle to maintain position here in ways that never happen at lower altitudes, and the surrounding terrain leaves almost no margin for error.
Watch your motor temperature. Extended flight at altitude forces motors to work harder, and sustained operation can lead to overheating in ways you won’t encounter at sea level. Keep individual flights to 12–15 minutes maximum, allow motors to cool between flights, and monitor your drone’s telemetry carefully.
Gear Worth Packing: Essential Equipment for High-Altitude Aerial Photography
At this altitude and in these conditions, your equipment choices matter more than almost anywhere else I’ve photographed. Here is what I recommend — and why each piece earned its place in my kit the hard way.
The SoloGood 1045 (10×4.5) Propellers — 16-piece set in Red and Black for F450/F550/S500 quadcopters became essential to my high-altitude kit after a hard lesson on a Peruvian plateau. At 2,400 m, I clipped a landing zone edge on an otherwise clean approach and snapped a prop — a common outcome when thin-air hovering demands more aggressive throttle corrections than usual. Because I had a full 16-piece replacement set on hand (8 clockwise, 8 counter-clockwise), I was airborne again in eight minutes rather than losing the day entirely. These 10-inch props are specifically valuable at altitude because the larger blade surface area compensates partially for the thinner air, generating more lift per revolution than shorter props on compatible frames. If you’re running an F450 or S500-class quad in this environment, carry these and never fly with only your installed set as your only backup. The color coding (red vs. black for CW vs. CCW) is a detail that matters when you’re cold, tired, and trying to swap props quickly before the morning light window closes.
The 4-piece Propeller Set for HS600, HS600D, V11, V11Pro, TF35 PRO drones deserves a dedicated spot in your pack if you’re flying one of these models in the Urubamba Valley. I witnessed a fellow photographer lose a full morning shoot when a single prop failed mid-flight over the valley — the drone executed its failsafe landing, but without a replacement on hand, that was the end of the session. These replacement blades are purpose-built for their specific drone models, which means the tolerances are exact and the balance is correct — critical factors at altitude where even minor vibration compounds into jello-rolling footage and motor strain. The compact four-piece format makes them extremely packable for the train journey from Cusco to Aguas Calientes, where pack weight and volume matter. Having model-specific props rather than universal substitutes also means your drone’s flight controller calibration remains accurate, preserving the hover stability you need for smooth footage in variable valley winds. Pack two sets minimum for any multi-day shoot.
The Universal 70mm/2.76-inch Green Drone Propellers — 16-pack compatible with S159, S166, AE20, YL59, V168, and AE20Max models rounds out a versatile spare parts strategy for photographers running smaller-format drones in this environment. Smaller drones are increasingly my preference for travel to restricted-airspace adjacent zones like the Cusco region — they pack into carry-on luggage, attract less attention from authorities, and are easier to transport on Peru Rail’s narrow trains. The high-strength blades in this 16-pack are specifically engineered for stability and low-noise operation, which matters both for your footage quality and for not attracting unnecessary attention in areas where drone sensitivity is high. I’ve used this size class of prop on AE20-family drones for valley floor shooting where the compact footprint lets me launch from tighter, more discreet positions. The full 16-piece count means you have genuine redundancy for a multi-day shoot, and the green coloring makes dropped props far easier to spot against dark jungle undergrowth — a trivially small detail that has saved me significant time and frustration on more than one occasion.
Best Time to Photograph Machu Picchu From Above: Season and Light
The dry season — May through September — is unequivocally the best period for aerial photography around Machu Picchu. June and July offer the clearest skies, with morning visibility that can extend 100+ km across the Andean range on good days. The wet season (November–March) brings afternoon cloud buildup that can be visually dramatic but dramatically reduces your flyable windows. Even in dry season, the valley generates its own localized cloud by 10:00 AM most days, which is why the early morning window is so critical.
The golden light at 6:00–7:00 AM in the dry season is extraordinary — low-angle sun catches the east-facing mountain walls in warm orange while the valley floor remains in deep blue shadow, creating a natural gradient that no post-processing can fully replicate. This is the light that makes every Inca ruins from above composition sing, and it’s worth the 4:30 AM alarm call to be in position for it. Afternoon golden hour (5:00–5:45 PM) produces different but equally dramatic light — longer shadows that emphasize terrain texture — but valley wind by this point often makes flying inadvisable. Plan your primary shoots for morning and use afternoons for scouting and ground photography.