| GPS Coordinates (Trolltunga) | 60.1241° N, 6.7398° E |
| Elevation at the Tongue | Approximately 1,180m above sea level |
| Drop Below the Tongue | ~700m above Lake Ringedalsvatnet |
| Recommended Altitude Range | 50–300m AGL (above ground level) depending on shot; stay below 120m AGL per standard EASA rules unless certified |
| Best Time of Day to Fly | Midnight sun window (June–July): 10 PM–2 AM for warm side-lit glow; standard season: golden hour 1–2 hours after sunrise |
| Best Season | Late June through mid-August for guaranteed access and midnight sun; late August–September for autumn color |
| Drone Regulations Summary | Norway follows EASA open category rules; recreational flights under 250g (e.g., DJI Mini series) require no registration in Open Category A1; drones 250g–25kg require operator registration and follow A1/A2/A3 subcategory rules; no specific ban at Trolltunga as of 2024; fly responsibly around other hikers; Hardangervidda National Park boundaries are nearby — confirm your exact position is outside park limits before flying |
| Skill Level Required | Intermediate to Advanced — strong unpredictable gusts, high altitude, long hike to location, cold temperatures affecting batteries |
| Nearest Town | Odda, Hordaland (~27 km) |
What the Trolltunga Aerial View Reveals That Ground Level Hides
Standing on Trolltunga, you feel exposed and vertiginous, yes — but the human brain does something protective. It anchors you to the rock beneath your feet. You feel the stone. You cannot truly perceive the 700-meter void below because your body refuses to process it honestly. From 80 meters above in the drone’s camera, that protection vanishes completely. The Trolltunga aerial view from above shows the tongue for what it actually is: a geological anomaly so structurally implausible that it looks like a rendering error. The platform is roughly 10 meters long and narrows to approximately 2 meters at its outermost tip — details that are essentially invisible when you are standing on it. From altitude, you see the thinness in its full context, surrounded by the vast Norwegian plateau on three sides and an enormous vertical drop on the fourth.
The aerial view also reveals the scale relationship between Trolltunga and Lake Ringedalsvatnet that makes this one of the most dramatic norway fjord drone photography compositions in Scandinavia. From the ground, the lake is a distant backdrop. From 200 meters above the tongue, the lake fills the lower half of your frame — a long, cold reservoir of electric blue-green water hemmed in by ridgelines — and Trolltunga appears as a tiny grey finger pointing accusatorially into the void above it. The surrounding Hardanger plateau, scarred by snowfields even in July, stretches for kilometers in every direction. What the camera shows you is not a cliff. It is a thin rock whisker on the face of an ancient landscape, and the contrast between the tongue’s human-scaled proportions and the inhuman scale of everything around it is what makes this place extraordinary from altitude.
One thing that genuinely surprised me from the air: the color of the lake changes dramatically depending on the time of day and cloud cover. At noon under direct sun, Ringedalsvatnet is an almost artificial turquoise — the kind of color that looks post-processed even when it isn’t. During the midnight sun window, around 11 PM, it shifts to a deeper steel blue with copper highlights on the surface, and the plateau above takes on an amber tone that makes the whole scene feel geological and ancient. Flying at different hours gives you what are essentially different photographs of the same place.
Trolltunga Drone Photography Norway: The Best Shots to Capture
After multiple flights at this location across two visits, here are the compositions I consider essential — and the technical parameters that make each one work.
The Profile Shot (The Definitive Trolltunga Image)
Position your drone at roughly the same elevation as the tongue — approximately 1,180m above sea level — and fly it out over the void, then rotate back toward the cliff face. From this angle, shooting horizontally, you capture the full profile of the tongue in silhouette: the 700-meter drop is visible as genuine empty air beneath the rock, with the lake surface far below. If you have a subject standing on the tip, they appear as a tiny human figure on an impossibly thin rock shelf with nothing beneath them for hundreds of meters. This is the shot that gets shared. Fly at 20–40 meters AGL horizontally from the cliff face. Morning or midnight sun light coming from the east or northeast catches the underside of the tongue and creates dramatic shadow contrast.
The God’s Eye View (Top-Down at 100–150m)
Send the drone directly above the tongue and point the gimbal straight down. At 100–150m above ground level, the tongue becomes a narrow grey slab extending into blue. The lake below is visible through the void on either side of the rock, and the surrounding plateau fills the frame edges. This composition works especially well when another hiker is standing at the tip — the scale difference between the small human figure and the vast geological context around them is immediately legible. Best captured at f/2.8 or equivalent wide open to maximize the color differentiation between grey rock, blue water, and green-brown plateau.
The Wide Landscape Pull-Back (250–300m)
This is the shot that provides geographic context and is increasingly popular as a drone reveal clip. At 250–300m above the tongue — pushing the limits of the standard 120m AGL recreational ceiling, so this requires appropriate certification under EASA A2 or A3 operating categories — Trolltunga becomes a tiny detail in a vast fjord landscape. The tongue is almost invisible until viewers know where to look, and that search-and-discover quality makes for compelling video. This is one of the best drone spots norway fjords for a wide-scale landscape composition that contextualizes a human-scale wonder within geological enormity. Be aware: at this altitude, winds are significantly stronger and less predictable than at ground level.
Can You Fly a Drone at Trolltunga? Regulations and Practical Reality
Norway is genuinely one of the most drone-friendly countries in Europe, and drone flying at Trolltunga cliff is legal under standard conditions as of my most recent visit and current regulations. Norway operates under EASA’s open category framework. For drones under 250 grams — the DJI Mini 4 Pro being the most common choice among traveling aerial photographers — you can fly in Open Category A1 without registration, provided you follow basic safety rules: don’t fly over crowds of people, maintain visual line of sight, stay clear of emergency operations. For heavier drones (250g–2kg), you need to register as an operator with the Norwegian Civil Aviation Authority (Luftfartstilsynet) and follow A1/A2 subcategory rules, including the standard 120m above ground level ceiling.
The critical practical caveat: Trolltunga sits close to the boundary of Hardangervidda National Park. Flying inside a Norwegian national park is prohibited without specific permission from the park authority. Before you fly, verify your exact GPS position against the official park boundary map. Trolltunga itself and the immediate approach trail area are outside the park, but if you fly wide landscape shots, your drone may cross into protected airspace. The Norwegian Environment Agency’s Naturbase mapping tool lets you overlay your planned flight path against protected area boundaries — use it before you go, not on the mountain.
There is also a practical crowd management reality. Trolltunga is one of Norway’s most visited hikes, with thousands of people on the trail on peak summer days. Norwegian drone regulations prohibit flying over gatherings of people, and on a July Saturday, the trail and the tongue platform are effectively a continuous crowd. My recommendation: fly early morning (the trail is quieter before 8 AM) or, better, during the midnight sun window between 10 PM and 2 AM, when the light is golden, the crowds are thin, and wind speeds are typically lower.
The Gear That Actually Matters: Battery Heat in Norwegian Mountain Cold
The single largest practical challenge of drone photography at Trolltunga is battery performance in cold mountain temperatures. Even in July, temperatures at 1,180 meters on the Norwegian plateau regularly sit between 2°C and 8°C, with wind chill bringing the felt temperature below zero. Cold temperatures cause lithium polymer batteries to discharge rapidly, reduce available capacity by 20–40%, and — most dangerously — can trigger low-voltage warnings mid-flight with no advance notice. I have had flights cut short at Trolltunga because I didn’t adequately protect my batteries on the long hike in. These three products directly address that problem, and I wouldn’t do this hike without at least one of them in my pack.
The shenruifa Drone Battery Constant Temperature Heating Bag USB A UAV Battery Warming Thermal Bag Compatible for NEO for Avata Series became my go-to solution on the Trolltunga approach trail specifically because it draws power from a standard USB-A port on a power bank — meaning I can keep batteries warm during the entire five-to-six hour hike in without any dedicated power source beyond the same power bank I use for my phone. The constant temperature design is the key feature here: it doesn’t just insulate, it actively maintains battery temperature at an operating-optimal level, so when you arrive at the tongue and pull a battery out to fly, it performs at close to full rated capacity rather than the depleted cold-weather capacity you’d get from a battery that sat in your pack unheated. On my last Trolltunga trip, I arrived with three warm batteries at essentially full capacity and got three full extended flights in — something that simply didn’t happen on my first trip when I hadn’t used active heating. The USB-A interface also means compatibility with nearly every power bank on the market, which matters when you’re already managing weight on a 22-kilometer round-trip hike.
For photographers running an Avata drone or a dual-battery setup, the Dual Compartment Drone Battery Constant Temperature Heating Bag with USB A Interface is the upgrade worth considering. The dual compartment design lets you warm two batteries simultaneously from a single USB-A connection, which means you are not making a trade-off choice between which battery gets heat during the hike in — both arrive warm and ready. At Trolltunga, where your window of ideal light during the midnight sun might be ninety minutes and you want every battery ready to fly immediately, the ability to pull a second warm battery from the heating bag without waiting for it to come up to temperature is genuinely valuable. I learned this lesson on my first visit when my second battery, cold-soaked in my pack for eleven hours, showed a depleted cell warning on first connection and I lost a planned third flight entirely. The dual compartment design fits cleanly into the side pocket of most hiking packs and adds negligible weight to an already heavy camera kit.
For base camp setups or situations where you’ve driven to a trailhead and are staging gear before a shorter approach, the Facon 8-1/2” x 5-1/2” Silicone Battery Heater Pad with Thermostatically Controlled, 120V, 60 Watts is a different but complementary solution. This is a thermostatically controlled silicone heater pad designed to wrap around or sit beneath batteries in a storage container, and it runs on 120V — meaning it’s a vehicle inverter or campsite power tool rather than a trail tool. Where it earns its place in a Norway drone kit is pre-flight preparation: plugging this into a vehicle inverter at the Skjeggedal or Mågelitopp trailhead parking area for 20–30 minutes before your hike brings your batteries to a warm baseline that the USB heating bags can then maintain during the approach. The thermostatically controlled operation prevents overheating, which matters because LiPo batteries are as sensitive to excessive heat as they are to cold. Using the Facon pad at the trailhead combined with one of the USB heating bags during the hike is, in my experience, the most reliable system for arriving at Trolltunga with flight-ready batteries in Norwegian mountain conditions.
Best Time for Trolltunga Aerial Photography: Seasonal and Daily Windows
Trolltunga is only accessible without specialist winter equipment from approximately late May through late September, with the official season typically running June 1 to September 30. The trail is managed by Trolltunga Active and requires pre-booking during peak season. For drone photography specifically, the optimal window is late June through mid-August, when the midnight sun creates a 24-hour photography opportunity that is essentially unique in the world. Between approximately 10 PM and 2 AM Norwegian summer time, the sun sits near the horizon and produces warm, side-raking golden light that makes every rock texture and water surface glow. The lake turns colors that are genuinely difficult to describe — a deep amber-tinted steel blue that photographs extraordinarily well from altitude. Crucially, crowds are minimal during these hours. The vast majority of hikers turn around before dark (or rather, before what would be dark in any other location on earth). You may have Trolltunga almost entirely to yourself at midnight, which changes both the photography and the experience fundamentally.
Late August and September offer a different but equally compelling palette: the plateau shifts from green to orange and rust as the season turns, and low-angle autumn light throughout the day creates long shadows that give the aerial shots dramatic depth. Temperatures drop faster in September, making battery management even more critical, but the colors reward the extra preparation. If you are planning a Norway photography trip and want to connect Trolltunga with other iconic locations, the Hardangerfjord region is one of the most productive areas for norway fjord drone photography in Scandinavia — consider pairing this location with Preikestolen (Pulpit Rock) or the Nærøyfjord for a multi-location aerial itinerary. We cover both in our Norway travel guides on the site.
Frequently Asked Questions
Is drone flying legal at Trolltunga in Norway?
Yes, drone flying at Trolltunga is legal under current Norwegian and EASA regulations as of 2024, provided you follow the applicable open category rules. Drones under 250g (such as DJI Mini series) can be flown recreationally in Open Category A1 without registration. Heavier drones require operator registration with Norway’s Civil Aviation Authority (Luftfartstilsynet). The critical restriction is proximity to Hardangervidda National Park — flying inside the national park is prohibited, and you must verify that your flight path stays within the unprotected area around the tongue using the Norwegian Environment Agency’s Naturbase mapping tool. Additionally, flying over crowds of people is prohibited; fly during low-traffic hours (early morning or midnight sun window) to stay compliant.
How do I protect drone batteries on the long hike to Trolltunga?
The Trolltunga hike is 10–12 hours round trip, and mountain temperatures at 1,180m elevation can drop batteries to 20–40% below rated capacity through cold exposure alone. The most effective solution is active battery warming using a USB-powered heating bag connected to a power bank during the hike in. Products like the shenruifa heating bag or the dual-compartment Avata heating bag maintain batteries at operating temperature throughout the approach, so you arrive with full-capacity batteries ready to fly. For trailhead preparation, a thermostatically controlled silicone heating pad powered through a vehicle inverter brings batteries to warm baseline before the hike begins.
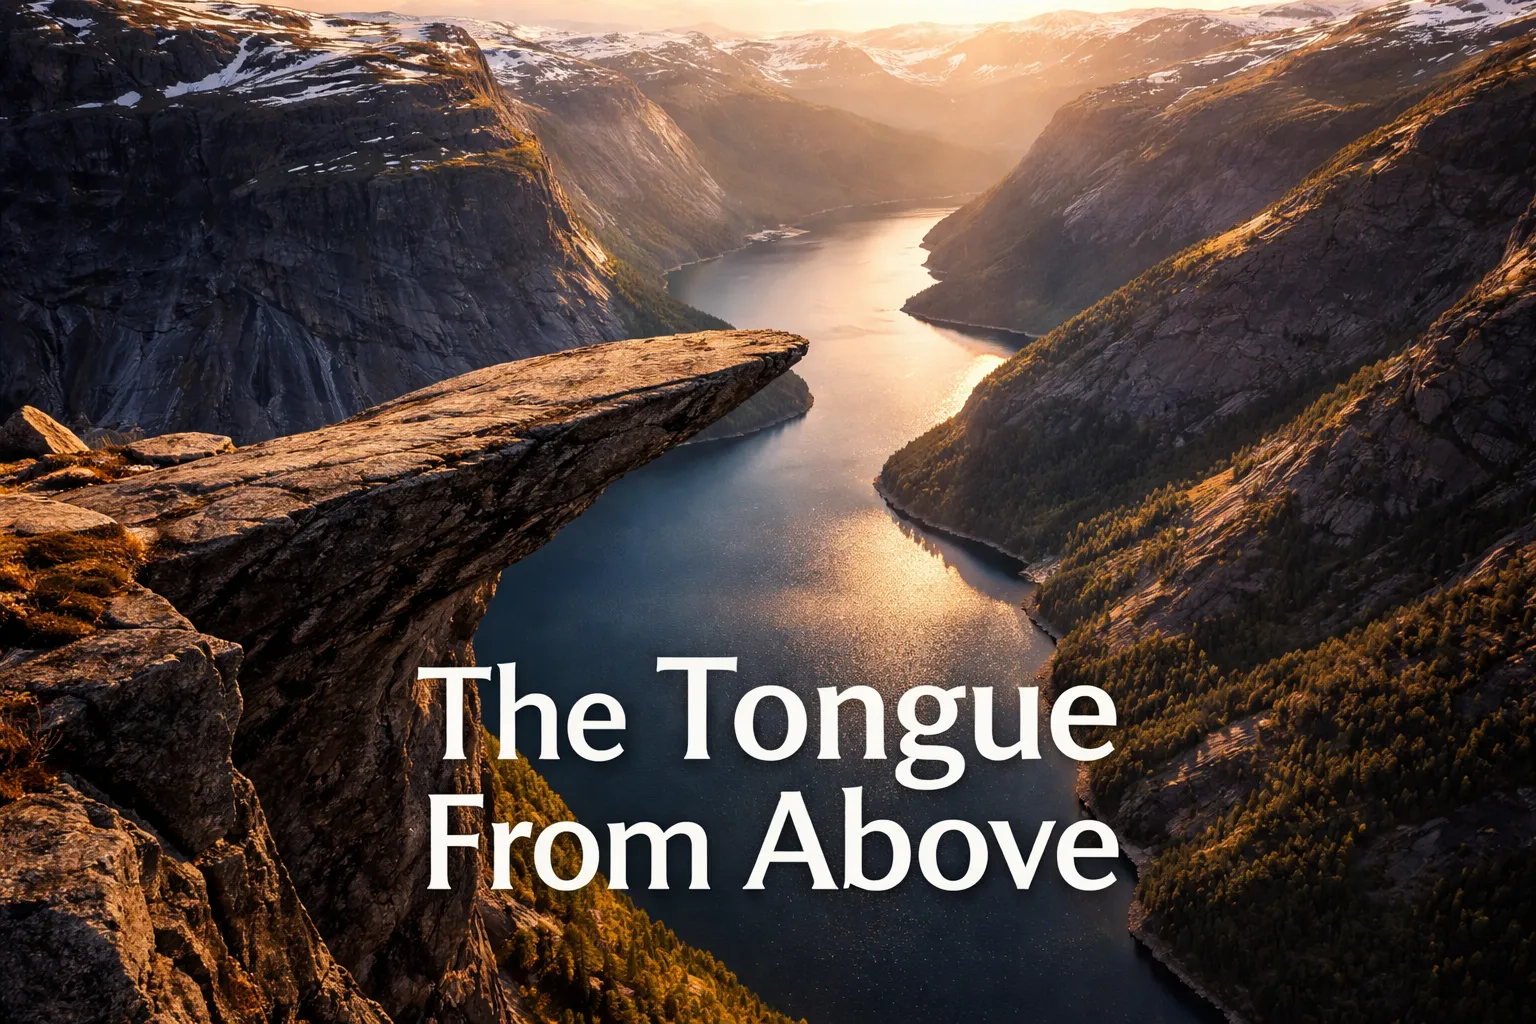
The first time I sent my drone over the edge of Trolltunga, my stomach dropped before the aircraft did. I had hiked eleven hours through Norwegian mountain terrain to reach this rock, and yet nothing — not the photos I’d studied, not the other hikers lined up for their turn on the tongue, not even standing at the edge myself — prepared me for what the live feed showed: a thin grey shelf of stone, barely two meters wide at its tip, suspended in absolute nothing, with Lake Ringedalsvatnet glittering 700 meters below like a dropped sapphire. Trolltunga drone photography Norway is genuinely in a category of its own. This is one of those locations where aerial imagery doesn’t just complement the ground-level experience — it reveals an entirely different geological truth that human eyes, standing on the tongue itself, can never fully process. If you are planning to fly here, this guide covers everything you need to know before you make the trek.
This post contains affiliate links. As an Amazon Associate, I earn from qualifying purchases at no extra cost to you.
Drone Flight Brief: Trolltunga Quick-Reference Data
| GPS Coordinates (Trolltunga) | 60.1241° N, 6.7398° E |
| Elevation at the Tongue | Approximately 1,180m above sea level |
| Drop Below the Tongue | ~700m above Lake Ringedalsvatnet |
| Recommended Altitude Range | 50–300m AGL (above ground level) depending on shot; stay below 120m AGL per standard EASA rules unless certified |
| Best Time of Day to Fly | Midnight sun window (June–July): 10 PM–2 AM for warm side-lit glow; standard season: golden hour 1–2 hours after sunrise |
| Best Season | Late June through mid-August for guaranteed access and midnight sun; late August–September for autumn color |
| Drone Regulations Summary | Norway follows EASA open category rules; recreational flights under 250g (e.g., DJI Mini series) require no registration in Open Category A1; drones 250g–25kg require operator registration and follow A1/A2/A3 subcategory rules; no specific ban at Trolltunga as of 2024; fly responsibly around other hikers; Hardangervidda National Park boundaries are nearby — confirm your exact position is outside park limits before flying |
| Skill Level Required | Intermediate to Advanced — strong unpredictable gusts, high altitude, long hike to location, cold temperatures affecting batteries |
| Nearest Town | Odda, Hordaland (~27 km) |
What the Trolltunga Aerial View Reveals That Ground Level Hides
Standing on Trolltunga, you feel exposed and vertiginous, yes — but the human brain does something protective. It anchors you to the rock beneath your feet. You feel the stone. You cannot truly perceive the 700-meter void below because your body refuses to process it honestly. From 80 meters above in the drone’s camera, that protection vanishes completely. The Trolltunga aerial view from above shows the tongue for what it actually is: a geological anomaly so structurally implausible that it looks like a rendering error. The platform is roughly 10 meters long and narrows to approximately 2 meters at its outermost tip — details that are essentially invisible when you are standing on it. From altitude, you see the thinness in its full context, surrounded by the vast Norwegian plateau on three sides and an enormous vertical drop on the fourth.
The aerial view also reveals the scale relationship between Trolltunga and Lake Ringedalsvatnet that makes this one of the most dramatic norway fjord drone photography compositions in Scandinavia. From the ground, the lake is a distant backdrop. From 200 meters above the tongue, the lake fills the lower half of your frame — a long, cold reservoir of electric blue-green water hemmed in by ridgelines — and Trolltunga appears as a tiny grey finger pointing accusatorially into the void above it. The surrounding Hardanger plateau, scarred by snowfields even in July, stretches for kilometers in every direction. What the camera shows you is not a cliff. It is a thin rock whisker on the face of an ancient landscape, and the contrast between the tongue’s human-scaled proportions and the inhuman scale of everything around it is what makes this place extraordinary from altitude.
One thing that genuinely surprised me from the air: the color of the lake changes dramatically depending on the time of day and cloud cover. At noon under direct sun, Ringedalsvatnet is an almost artificial turquoise — the kind of color that looks post-processed even when it isn’t. During the midnight sun window, around 11 PM, it shifts to a deeper steel blue with copper highlights on the surface, and the plateau above takes on an amber tone that makes the whole scene feel geological and ancient. Flying at different hours gives you what are essentially different photographs of the same place.
Trolltunga Drone Photography Norway: The Best Shots to Capture
After multiple flights at this location across two visits, here are the compositions I consider essential — and the technical parameters that make each one work.
The Profile Shot (The Definitive Trolltunga Image)
Position your drone at roughly the same elevation as the tongue — approximately 1,180m above sea level — and fly it out over the void, then rotate back toward the cliff face. From this angle, shooting horizontally, you capture the full profile of the tongue in silhouette: the 700-meter drop is visible as genuine empty air beneath the rock, with the lake surface far below. If you have a subject standing on the tip, they appear as a tiny human figure on an impossibly thin rock shelf with nothing beneath them for hundreds of meters. This is the shot that gets shared. Fly at 20–40 meters AGL horizontally from the cliff face. Morning or midnight sun light coming from the east or northeast catches the underside of the tongue and creates dramatic shadow contrast.
The God’s Eye View (Top-Down at 100–150m)
Send the drone directly above the tongue and point the gimbal straight down. At 100–150m above ground level, the tongue becomes a narrow grey slab extending into blue. The lake below is visible through the void on either side of the rock, and the surrounding plateau fills the frame edges. This composition works especially well when another hiker is standing at the tip — the scale difference between the small human figure and the vast geological context around them is immediately legible. Best captured at f/2.8 or equivalent wide open to maximize the color differentiation between grey rock, blue water, and green-brown plateau.
The Wide Landscape Pull-Back (250–300m)
This is the shot that provides geographic context and is increasingly popular as a drone reveal clip. At 250–300m above the tongue — pushing the limits of the standard 120m AGL recreational ceiling, so this requires appropriate certification under EASA A2 or A3 operating categories — Trolltunga becomes a tiny detail in a vast fjord landscape. The tongue is almost invisible until viewers know where to look, and that search-and-discover quality makes for compelling video. This is one of the best drone spots norway fjords for a wide-scale landscape composition that contextualizes a human-scale wonder within geological enormity. Be aware: at this altitude, winds are significantly stronger and less predictable than at ground level.
Can You Fly a Drone at Trolltunga? Regulations and Practical Reality
Norway is genuinely one of the most drone-friendly countries in Europe, and drone flying at Trolltunga cliff is legal under standard conditions as of my most recent visit and current regulations. Norway operates under EASA’s open category framework. For drones under 250 grams — the DJI Mini 4 Pro being the most common choice among traveling aerial photographers — you can fly in Open Category A1 without registration, provided you follow basic safety rules: don’t fly over crowds of people, maintain visual line of sight, stay clear of emergency operations. For heavier drones (250g–2kg), you need to register as an operator with the Norwegian Civil Aviation Authority (Luftfartstilsynet) and follow A1/A2 subcategory rules, including the standard 120m above ground level ceiling.
The critical practical caveat: Trolltunga sits close to the boundary of Hardangervidda National Park. Flying inside a Norwegian national park is prohibited without specific permission from the park authority. Before you fly, verify your exact GPS position against the official park boundary map. Trolltunga itself and the immediate approach trail area are outside the park, but if you fly wide landscape shots, your drone may cross into protected airspace. The Norwegian Environment Agency’s Naturbase mapping tool lets you overlay your planned flight path against protected area boundaries — use it before you go, not on the mountain.
There is also a practical crowd management reality. Trolltunga is one of Norway’s most visited hikes, with thousands of people on the trail on peak summer days. Norwegian drone regulations prohibit flying over gatherings of people, and on a July Saturday, the trail and the tongue platform are effectively a continuous crowd. My recommendation: fly early morning (the trail is quieter before 8 AM) or, better, during the midnight sun window between 10 PM and 2 AM, when the light is golden, the crowds are thin, and wind speeds are typically lower.
The Gear That Actually Matters: Battery Heat in Norwegian Mountain Cold
The single largest practical challenge of drone photography at Trolltunga is battery performance in cold mountain temperatures. Even in July, temperatures at 1,180 meters on the Norwegian plateau regularly sit between 2°C and 8°C, with wind chill bringing the felt temperature below zero. Cold temperatures cause lithium polymer batteries to discharge rapidly, reduce available capacity by 20–40%, and — most dangerously — can trigger low-voltage warnings mid-flight with no advance notice. I have had flights cut short at Trolltunga because I didn’t adequately protect my batteries on the long hike in. These three products directly address that problem, and I wouldn’t do this hike without at least one of them in my pack.
The shenruifa Drone Battery Constant Temperature Heating Bag USB A UAV Battery Warming Thermal Bag Compatible for NEO for Avata Series became my go-to solution on the Trolltunga approach trail specifically because it draws power from a standard USB-A port on a power bank — meaning I can keep batteries warm during the entire five-to-six hour hike in without any dedicated power source beyond the same power bank I use for my phone. The constant temperature design is the key feature here: it doesn’t just insulate, it actively maintains battery temperature at an operating-optimal level, so when you arrive at the tongue and pull a battery out to fly, it performs at close to full rated capacity rather than the depleted cold-weather capacity you’d get from a battery that sat in your pack unheated. On my last Trolltunga trip, I arrived with three warm batteries at essentially full capacity and got three full extended flights in — something that simply didn’t happen on my first trip when I hadn’t used active heating. The USB-A interface also means compatibility with nearly every power bank on the market, which matters when you’re already managing weight on a 22-kilometer round-trip hike.
For photographers running an Avata drone or a dual-battery setup, the Dual Compartment Drone Battery Constant Temperature Heating Bag with USB A Interface is the upgrade worth considering. The dual compartment design lets you warm two batteries simultaneously from a single USB-A connection, which means you are not making a trade-off choice between which battery gets heat during the hike in — both arrive warm and ready. At Trolltunga, where your window of ideal light during the midnight sun might be ninety minutes and you want every battery ready to fly immediately, the ability to pull a second warm battery from the heating bag without waiting for it to come up to temperature is genuinely valuable. I learned this lesson on my first visit when my second battery, cold-soaked in my pack for eleven hours, showed a depleted cell warning on first connection and I lost a planned third flight entirely. The dual compartment design fits cleanly into the side pocket of most hiking packs and adds negligible weight to an already heavy camera kit.
For base camp setups or situations where you’ve driven to a trailhead and are staging gear before a shorter approach, the Facon 8-1/2” x 5-1/2” Silicone Battery Heater Pad with Thermostatically Controlled, 120V, 60 Watts is a different but complementary solution. This is a thermostatically controlled silicone heater pad designed to wrap around or sit beneath batteries in a storage container, and it runs on 120V — meaning it’s a vehicle inverter or campsite power tool rather than a trail tool. Where it earns its place in a Norway drone kit is pre-flight preparation: plugging this into a vehicle inverter at the Skjeggedal or Mågelitopp trailhead parking area for 20–30 minutes before your hike brings your batteries to a warm baseline that the USB heating bags can then maintain during the approach. The thermostatically controlled operation prevents overheating, which matters because LiPo batteries are as sensitive to excessive heat as they are to cold. Using the Facon pad at the trailhead combined with one of the USB heating bags during the hike is, in my experience, the most reliable system for arriving at Trolltunga with flight-ready batteries in Norwegian mountain conditions.
Best Time for Trolltunga Aerial Photography: Seasonal and Daily Windows
Trolltunga is only accessible without specialist winter equipment from approximately late May through late September, with the official season typically running June 1 to September 30. The trail is managed by Trolltunga Active and requires pre-booking during peak season. For drone photography specifically, the optimal window is late June through mid-August, when the midnight sun creates a 24-hour photography opportunity that is essentially unique in the world. Between approximately 10 PM and 2 AM Norwegian summer time, the sun sits near the horizon and produces warm, side-raking golden light that makes every rock texture and water surface glow. The lake turns colors that are genuinely difficult to describe — a deep amber-tinted steel blue that photographs extraordinarily well from altitude. Crucially, crowds are minimal during these hours. The vast majority of hikers turn around before dark (or rather, before what would be dark in any other location on earth). You may have Trolltunga almost entirely to yourself at midnight, which changes both the photography and the experience fundamentally.
Late August and September offer a different but equally compelling palette: the plateau shifts from green to orange and rust as the season turns, and low-angle autumn light throughout the day creates long shadows that give the aerial shots dramatic depth. Temperatures drop faster in September, making battery management even more critical, but the colors reward the extra preparation. If you are planning a Norway photography trip and want to connect Trolltunga with other iconic locations, the Hardangerfjord region is one of the most productive areas for norway fjord drone photography in Scandinavia — consider pairing this location with Preikestolen (Pulpit Rock) or the Nærøyfjord for a multi-location aerial itinerary. We cover both in our Norway travel guides on the site.
Frequently Asked Questions
Is drone flying legal at Trolltunga in Norway?
Yes, drone flying at Trolltunga is legal under current Norwegian and EASA regulations as of 2024, provided you follow the applicable open category rules. Drones under 250g (such as DJI Mini series) can be flown recreationally in Open Category A1 without registration. Heavier drones require operator registration with Norway’s Civil Aviation Authority (Luftfartstilsynet). The critical restriction is proximity to Hardangervidda National Park — flying inside the national park is prohibited, and you must verify that your flight path stays within the unprotected area around the tongue using the Norwegian Environment Agency’s Naturbase mapping tool. Additionally, flying over crowds of people is prohibited; fly during low-traffic hours (early morning or midnight sun window) to stay compliant.
How do I protect drone batteries on the long hike to Trolltunga?
The Trolltunga hike is 10–12 hours round trip, and mountain temperatures at 1,180m elevation can drop batteries to 20–40% below rated capacity through cold exposure alone. The most effective solution is active battery warming using a USB-powered heating bag connected to a power bank during the hike in. Products like the shenruifa heating bag or the dual-compartment Avata heating bag maintain batteries at operating temperature throughout the approach, so you arrive with full-capacity batteries ready to fly. For trailhead preparation, a thermostatically controlled silicone heating pad powered through a vehicle inverter brings batteries to warm baseline before the hike begins.